Tuesday, 21 April 2015

How To Find IP Address On Your Mac OS X


As we all know that, IP address (which is known as Internet Protocol Address) is a special type of address which is used to identify your computer on the web.


Finding the IP address of your Mac is very much necessary, especially when you are setting up a network connection or sharing your files or other data with another computer. You can also use an IP address to remote control another computer. So, if you want to find IP address on your Mac OS X but doesn’t know how to find it? Then, don’t worry because today I have created this tutorial in which I will show you that how you can easily and quickly find the IP address on your Mac OS X. So, without wasting much of your time, let’s get started.

Learn-How To Find Your IP Address 

So, if you want to find IP address on your Mac OS X then follow the below given steps.
  • First of all, open up your Mac OS X computer.
  • Then, you have to click on the small Apple icon, it will be located on the upper-right corner of the screen.
  • Now, from the Apple drop-down menu, you have to select the System Preferencesoption.
  • After that, in the Internet & Wireless section, you have to click on the Networkoption.
  • Now, simply select your network connection and then you will see your Mac’s IP address right underneath the Status: Connected section.
  • That is it! You are done!
There is also another method that you can use to find your Mac’s IP address. Well, in this method we will be using the Terminal to find the IP address of your Mac computer. So, follow the below given steps to find your Mac’s IP address using Terminal.
  • At first, you have to open up Terminal, you can easily access it in the Utilities area.
  • Now, in the Terminal, you have to type ipconfig.
  • After that, your IP address will be appeared right next to inet text.
  • That’s it! You are done!

Conclusion

So, this was all about how to find IP address on your Mac OS X. I hope that now you will be able to find your Mac’s IP address without any type of problem. If you have any type of queries regarding this tutorial then do let us know, we will try our best to resolve them. Additionally, if you’d like this tutorial then don’t forget to share this with your friends and social circles too.

Monday, 20 April 2015

The Best Computer Tips and Tricks: Firefox 2


Redirect Search Results

You can control where you see your search results. Type about:config into your location bar and find "browser.search.openintab", then double click to make it "true." Now when you use the search bar, your results will pop up in a separate tab instead of taking you away from your current page.

Disable Window Resizing

Web pages that resize windows drive some people up the wall. To fix that, go to Tools > Options, and open the Content tab. Click on the Advanced button next to "Enable JavaScript," then deselect the check box that allows scripts to "Move or resize existing windows."

Choose a Tab

As with IE, Ctrl+Tab will let you cycle through open tabs in Firefox. But if you want to go to a specific tab without using the mouse, use the Ctrl key and the number of the tab's position—Ctrl+1, for example, will open the first tab, Ctrl+2 the second, and so on.

Browse Without a Mouse

Tired of using the mouse? Ctrl+L will move you to Firefox's location bar, while Ctrl+K will move you to the search bar. (When you're there, hold Ctrl and use the up or down arrow keys to toggle the default search engine.)

Open multiple sites at startup

If you want to open multiple Web sites when you start Firefox, go to Tools > Options. Under the Startup section on the Main tab, you'll see the Home Page field. Enter the sites you want to open in this manner:
www.computershopper.com | www.collegebuyingguide.com.

Mousing Around

Your mouse gives you more browsing control than you might think. If you have a scroll wheel button, clicking it on a hyperlink will open it up in a new tab, while clicking it on a tab will close it. If you hold down the Shift key while scrolling, you can move backward or forward through your browsing history.

Quickly Cross-reference

Ever found something in an online article you instantly wanted more information about? Search for that information easily by highlighting the text, dragging it to the search bar, and pressing Enter. Firefox will search for that text automatically.

Delete Inaccurate URLs

If you've ever mistyped a Web site's address and then seen your mistake pop up whenever you retype the site's name, just highlight the site in the history and press Shift+Delete to get rid of it for good.

Stay Stealthy

If you don't want sites to know where you're coming from, type about:config into the location bar and then find the network.http.sendRefererHeader record. Double click on it, and change the "2" value to "0" to prevent Web sites from seeing your referrer information.

Get More Viewing Space

Want to maximize the Web-site view in your browser window? Then make your icons smaller. Just go to View > Toolbars > Customize and check the box next to "Use Small Icons."

Quick URL Fill-in

If you type a site's address without the usual ".com" or "www" and press Ctrl+Enter, Firefox will fill in the rest of the URL for you.

Give Your Bookmarks Keywords

To assign a keyword to a bookmark, simply right-click on it and select Properties. Write a word in the keyword field, and now when you type the word into the location bar, you'll automatically go to that site.

Curb Firefox's RAM Appetite

Firefox was once famous for how light it was on system resources. With each new update, however, it seems be become a bigger and bigger memory hog. Rein Firefox in a little by limiting the amount of memory it uses. Type about:config in the address bar and locate "browser.cache.disk.capacity." Normally, it's set to "50000," but you can lower that number if you find Firefox is using too much system memory.

Cleaner Google File Searches

Searching for multimedia files on Google can result in a lot of spammy results. An effective—if clunky—way to minimize getting such results is to type intitle:"index.of"(xxx|yyy)zzzz -html -htm -php into the search bar, where "xxx|yyy" are the types of files you want to find (such as "mp3|avi") and "zzzz" being the name of the files you want to find.

The Best Computer Tips and Tricks: Keyboard Shortcuts for Windows Vista and XP and Microsoft Office and Windows 7,8


Windows Key+E

The best part about shortcut keys is letting your keyboard do half the work. This is a perfect example: This shortcut allows you to open Windows Explorer with one quick keystroke.

Windows Key+M

This is the shortcut to keep in mind when you are at work doing anything but working—it allows you to minimize all of your open windows, leaving just the desktop left exposed. To restore the windows, hit Windows key+Shift+M. Another quick way to do this is Windows key+D, which shows your desktop; to restore, just repeat the same keystroke. This is a handy shortcut to have around the next time your boss is wandering through the office.

Alt+Tab

This allows you to easily scroll through all the windows you have open. If you're working in Word and referring to something in Explorer, for example, you can toggle back and forth between the two programs. You can also use this to switch between windows in the same program, making multitasking a breeze. Very similar is Windows key+Tab: In XP, it lets you scroll the items on the taskbar, and in Vista, it starts Flip 3D for a fun graphical spin on the same idea.

Alt+F4

This shortcut is a quick way to close a window in any program. Alt+Spacebar+C (which requires less stretching, but more keys) and Ctrl+W do the same thing. Any of the ways will allow you to close a window without using your mouse to hit the X in the upper-right corner.

Ctrl+Arrow Keys

In Microsoft Word, the left and right arrows allow you to move the cursor to the beginning of the previous word or the next word; the up and down arrows will do the same with paragraphs. This is very helpful when editing a document or scanning for any reason.

Shift+Delete

If you want to delete a file—and you don't want to deal with it later in the Recycle Bin—this is the way to go. Just be absolutely sure that this is a file you won't want back!

Hold Shift While Inserting a CD

Have you ever wanted to insert a CD and not use it right away? This shortcut allows you to bypass Autorun when inserting a CD so you can control exactly when you will use a CD you've inserted.

Ctrl+Drag

There are many ways to copy a file, but this just might be the easiest. All you have to do is click on the file, hold, and drag it into its desired location. This works the same as another handy shortcut, Ctrl+C.

Windows Key+U+U

Quickly shut down Windows by hitting the Windows key (don't hold it down), hitting U to reach the shutdown menu, and then hitting U again to shut down.

Windows Key+Pause

Need a quick way to get to the Systems Properties menu without too much thought? Just press these two keys and you'll be brought right to it.

Ctrl+Z, Ctrl+Y

Undo an action by hitting Ctrl+Z; if you change your mind, Ctrl+Y will redo the undo.

Shift + Arrow Keys

Holding shift and pressing one of the arrow keys will highlight text in Word (or a group of Excel cells) without the mouse, selecting in the direction the arrow points.

Ctrl+U, Ctrl+B, Ctrl+I

This one's for Office newbies. It's a snap to underline, bold, and italicize without the mouse if you press Ctrl+U (underlining), Ctrl+B (bolding), or Ctrl+I (italicizing).

How to create your own search engine like Google


If you want to create a search engine like google then  Follow the steps as i done: 


  • First Of All go to the "www.goglogo.com",like this

  • Then type anything or name in it as like me, i have written "programmersOf2015":

  • Then your search engine will be generated:for comedy copy the URL and send it to any of your friend to troll him :P


Sunday, 19 April 2015

Download Adobe Photoshop CS6 Full Free. Only 110mb


Photoshop CS6, released in May 2013, added new creative design tools and provided a redesigned interface with a focus on enhanced performance. New features have been added to the Content-Aware tool such as the Content-Aware Patch and Content-Aware Move.Adobe Photoshop CS6 brought a suite of tools for video editing. Color and exposure adjustments, as well as layers, are among a few things that are featured in this new editor. Upon completion of editing, the user is presented with a handful of options of exporting into a few popular formats.
Features of Photoshop CS6
1 : Awesome Editing Tool.
2 : There are new adjustments like layers are also been set in this editor.
3 : New Tools for Color and exposure adjustments.
4 : Powerful editing brushes and other tools.
5 : Upon completing of editing the user is presented with a handful of options of exporting into a few popular formats.

This version of Adobe Photoshop
This version of the Adobe Photoshop is Photoshop CS6 Extended.
The best thing about this is that it take little space on your pc. Take a Look at the Download Options Below.
Download


How to Protect your Facebook Photos Online


Facebook takes utmost care of their users but we also need to take some care about our privacy. As we all know that a coin has two sides that the Facebook has also got both the good and bad people on it! I strongly say think before sharing anything on Facebook because some people on Facebook are making use of these images of other Facebook users for the bad things for online and offline usage.


The only thing we can do to protect our Facebook photos is setting the album privacy to only our friends! But what about the people who had so many people as their friends! Watermark is a simple way to stop others from using your images for bad things.
You might me be getting a doubt “Will this stop spammers and bad people from using images?” The answer to your doubt is it can’t stop the spammers and bad people from using your images but you can stop to some extent. Because most of the spammers want bulk amount of images downloaded which are not watermarked and then use them for their work, as they don’t want to waste time on editing your images! This way we can stop the spammers from using the images to some extent.

What is DMCA

The DMCA is the short-form of Digital Millennium Copyright Act. DMCA helps the original copyrighted holder to protect their work from being  used by the other people. The work can include blog content, videos, pictures, websites, gamesDMCA also lets you to file a case in complete legal way against those who copied your work.

Learn-How to Use DMCA Tool to Watermark the Images

  • First register an account with DMCA from Here.

  • After completion of registration Facebook watermark tool from Here or if you are redirected to the watermark page after the registration yourself then its fine.
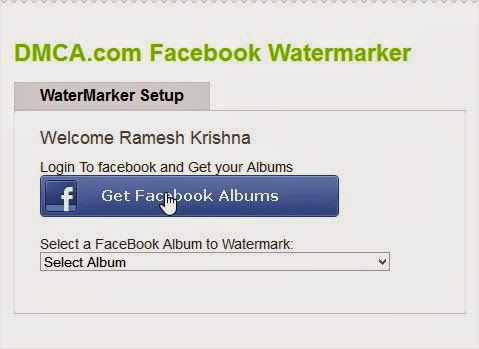
  • Now Authorize DMCA to get the images from your Facebook profile by clicking on “Get Facebook Albums’

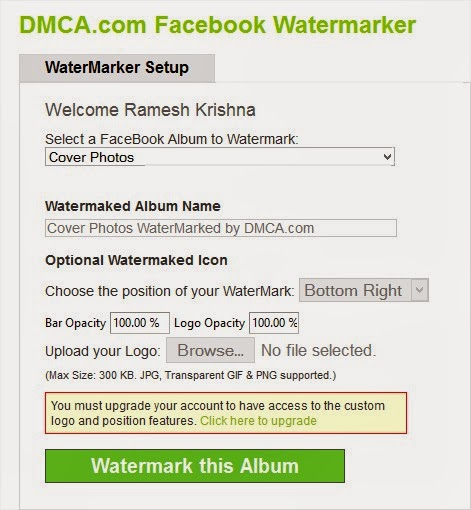
  • After grating the access to get the images, select any album from Dropbox menu.

  • Hit on Watermark this Album and you are done. That’s it all your images will be watermarked with DMCA logo.
  • In order to remove the DMCA logo and add your own logo you need to upgrade your plan to monthly to yearly.
  • This was it!

Conclusion

This was all about to protect and secure your Facebook Photos. We are sure that after applying these tips most of your concerns related to this issue have been removed now. Furthermore, if you have any questions left related to this issue then do let us know. We shall get back to your queries as soon as possible. Till then don’t forget to share this guide with your other friends and circle too.

Facebook Security Tips - Scan your FB Profile


The Facebook has become one of the most important aspect of human life now. There are millions of people who uses Facebook daily. However, let me share a unusual fact with you guys, that your Facebook account can be hit through viruses, malware, trojans and other threats which may create various issues and problems with your Facebook account.


So, to make your profile complete secure and protected, we are sharing some Facebook Security tips here. Actually, we are sharing some Facebook apps with you, which will help you to scan your Facebook profile and will help you to remove certain threats from it.

Bitdefender Safego

  • Bitdefender Safego protects your Facebook account from all sorts of e-trouble: scams, spam, malware and private data exposure. Safego also keeps your friends safe.
  • Safego also keeps your online friends safe and …close.
BITDEFENDER SAEGO:

NORTON SafeWeb for Facebook


  • Safeguard against malicious URLs by scanning your feed using Norton Safe Web. Protect your friends by advising them of malicious URLs you might have in your feed.
NORTON SAFEWEB FOR FACEBOOK

SECURE.ME (ANTIVIRUS OF FACEBOOK)


  • Secure.me works like antivirus for social networks and apps. Using sophisticated algorithms, we identify posts and photos that pose a threat to your privacy, security and reputation. In addition to your own Facebook profile, we also monitor your friends network to keep you safe and secure.

Conclusion

These were some Facebook security tips for you guys. You may use any of the above app to remove different viruses, threats and attacks from your FB profile. If you have any kind of question or confusion left related to this issue. Then do let us know. We shall get back to your queries and questions as soon as possible. Till then don’t forget to share this guide with your other friends and circle too. You may never know that your share may be proven helpful and worth reading for many of the users out there. So, keep sharing and liking our content over social media.